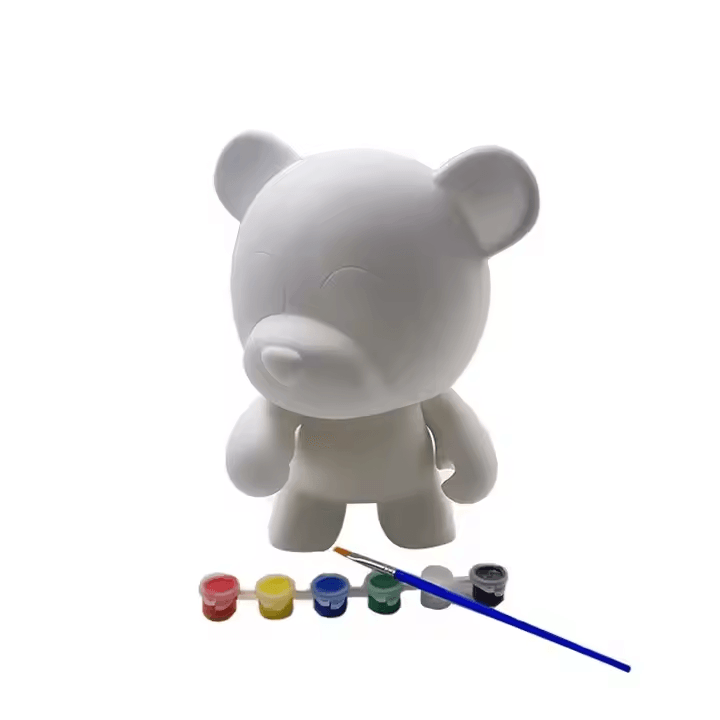
How Do You Turn an Original Character into a Collectible Toy?
This guide shows how to create original character figures from concept to product—covering sculpting, materials, and timelines for custom figurine production.
I hope you enjoy reading this blog post. If you are looking for custom figurines, click here.
You’ve created an amazing character. But bringing it to life as a figure feels overwhelming—so many steps, vendors, and costs. This guide shows how to make your dream collectible real.
Turning your original character into a collectible figure starts with a clear concept, then moves through 3D design, prototype creation, material selection, and production. Whether you’re an artist, brand owner, or hobbyist, this guide breaks down each step and offers practical advice to help you avoid common mistakes and choose the right partner.
Let’s walk through the full process—from drawing board to finished figure—without the stress or guesswork.
Before any modeling or moulding begins, it’s essential to clearly define your character and how you want it represented in 3D form.
Start with high-resolution concept art (front, side, and back views if possible). Define scale, pose, facial expression, accessories, and materials upfront to avoid surprises later.
If you only have a single sketch, that’s okay—many designers work from limited references. But the more angles and annotations you can provide, the easier it is for a sculptor to capture the right proportions and personality. Include color palettes, texture ideas, and whether certain parts should be removable or articulated. A clear visual brief speeds up 3D modeling and prevents costly back-and-forth.
This is where your flat illustration starts gaining volume and depth. Most creators work with a professional 3D artist if they don’t sculpt themselves.
Your 2D art is translated into a 3D model using programs like ZBrush or Blender. You’ll review digital sculpts, request edits, and approve a final render for prototyping.
The best 3D sculpts strike a balance between artistic expression and manufacturability. Avoid details too fine to cast or paint cleanly at scale. A good factory can provide feedback on geometry—like overhangs, undercuts, or weak points—that may affect casting. Once approved, your model is exported in STL or OBJ format and prepared for resin printing or soft vinyl prototyping.
Your choice of material will impact not just how the figure feels, but how much it costs, how long it takes, and how limited it can be.
For smaller runs (50–500 pcs), resin is ideal—crisp detail, hand-painted, and easy to mold. For larger runs, PVC or vinyl offers better flexibility and cost-efficiency.
Resin is perfect for artist collectibles, thanks to its weight and ultra-sharp sculpting fidelity. But it’s brittle, so avoid thin limbs or fragile parts unless packed well. PVC offers more durability and is used in most mass-market action figures. Soft vinyl is great for stylized figures and kaiju-style collectibles. Your factory can advise on the best option based on quantity, complexity, and budget.
Rushing leads to mistakes. But you don’t need to wait six months either—most projects take 4 to 10 weeks.
From design to delivery, resin figures typically take 30–60 days. Vinyl or PVC production can take 90–120 days due to mould-making and mass assembly steps.
Here’s a general timeline for resin:
Week 1: 3D sculpting
Week 2–3: Sampling and revisions
Week 4–6: Mould-making + hand-casting
Week 7–8: Painting + packaging + shipping
For vinyl:
Week 1–3: Sculpt + mould prep
Week 4–7: Mould creation
Week 8–11: Test shot and revisions
Week 12+: Mass run and freight
Start early, especially if targeting an event, holiday, or product launch.
Choosing the wrong partner can ruin your vision. You need someone who speaks both design and production fluently.
Look for a factory experienced in low-MOQ projects, with real photos of past work and clear answers about materials, packaging, and lead times.
Ask these key questions before starting:
Can they work from your existing 3D model or help you sculpt?
Do they offer one-stop service (modelling, sampling, painting, packaging)?
What materials and finishes are available?
Can they show past client samples or reviews?
Do they allow sampling before mass production?
Factories like DesignaToy specialize in turning original character figures into high-quality, small-batch collectibles. If you want smooth communication, custom detailing, and professional shipping—we’re here to help.
Turning your original character into a collectible figure isn’t as hard—or expensive—as you might think. With the right planning, materials, and partner, you can create something fans will treasure and share. If you’ve got a character and a vision, we’ll help you bring it to life. Contact [email protected] or visit customarttoy.com to start your journey.
I really enjoy the art toy industry because my work makes my clients’ products more beautiful and enjoyable. If you have any questions about custom figurines, feel free to contact me!
This guide shows how to create original character figures from concept to product—covering sculpting, materials, and timelines for custom figurine production.
The best markers for vinyl toys are alcohol-based markers like Copic or Sharpie Oil-Based Paint Markers. For paints, acrylic paints such as Liquitex or Golden are ideal due to their strong adhesion and vibrant colors. These options provide durability, smooth application, and a professional finish on vinyl surfaces.
To make a resin figure, begin by conceptualizing and designing your figure, create a prototype, make a silicone mold, cast the resin, and finally, demold and finish your piece. By following these steps, you can craft a unique resin figure that showcases your artistic vision.
We are a custom vinyl toys manufacturer dedicated to transforming your creative ideas into unique, high-quality figures. With a focus on detail and customization, we bring your visions to life, whether for personal projects or limited edition collections.
Need something helped in a short time? We’ve got a plan for you.